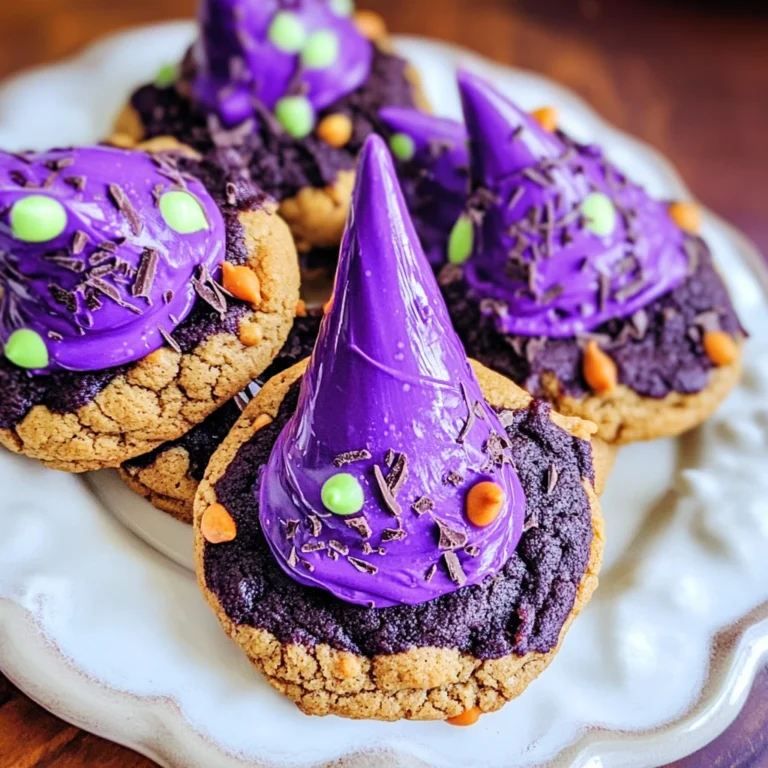
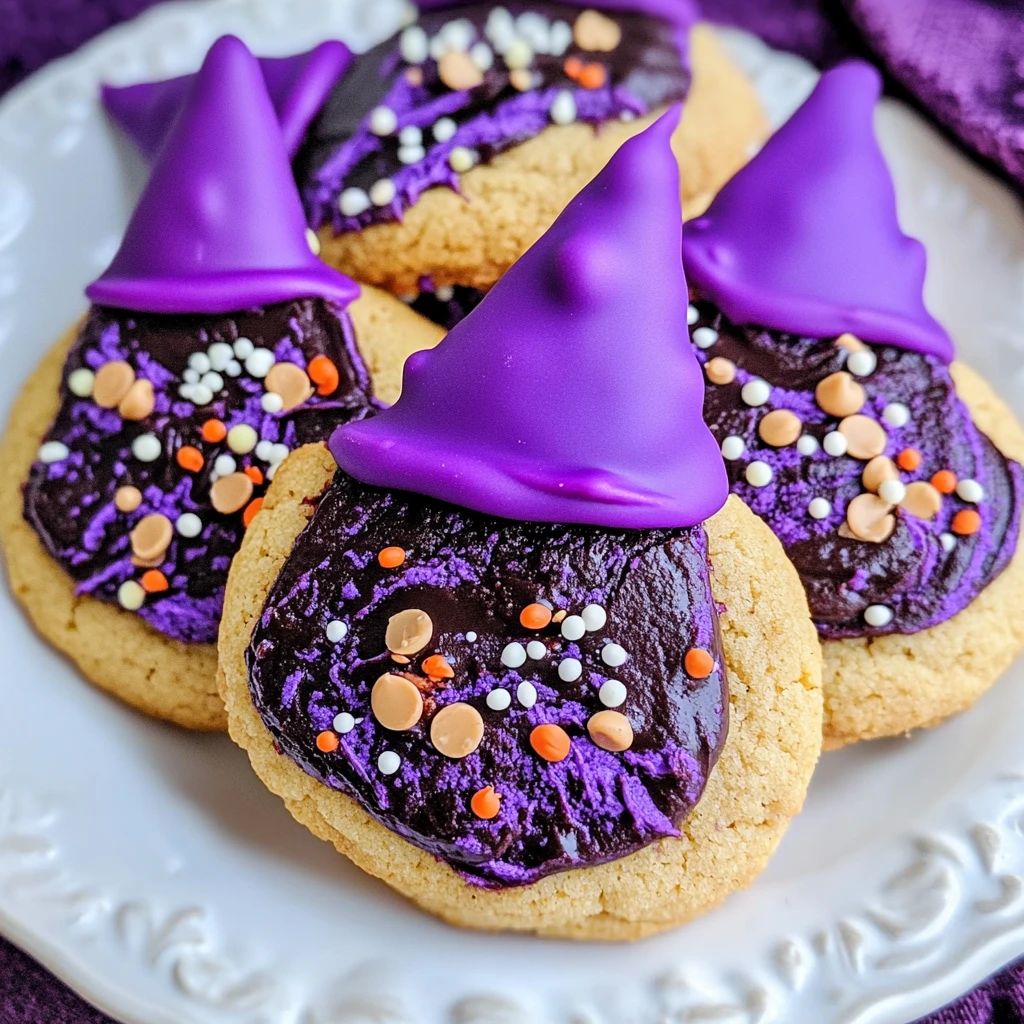
As the air turns crisp and the leaves begin to fall, there’s no better way to celebrate the Halloween season than with a batch of festive Witch Hat Halloween Cookies. These delightful treats combine the rich, nutty flavor of peanut butter with the whimsical charm of a witch’s hat, creating a delicious and visually striking dessert that’s sure to delight both kids and adults alike.
Table of Contents
Ingredients for Witch Hat Halloween Cookies
- 1 ½ cups all-purpose flour
- 2 teaspoons cornstarch
- ¼ teaspoon baking powder
- ½ teaspoon baking soda
- ¼ teaspoon salt
- ½ cup unsalted butter, softened
- 1 cup granulated sugar
- 1 egg, room temperature
- 1 teaspoon vanilla extract
- ¾ cup creamy peanut butter
- Purple gel food coloring
- 30 Hugs or chocolate kisses, carefully unwrapped
Step-by-Step Instructions for Witch Hat Halloween Cookies
Preheating the oven and preparing the baking sheets is the first step in creating these spooky Witch Hat Halloween Cookies. Preheat your oven to 350°F (175°C) and line your baking sheets with parchment paper for easy cleanup.
Next, it’s time to mix the dry ingredients. In a medium bowl, whisk together the all-purpose flour, cornstarch, baking powder, baking soda, and salt. This ensures an even distribution of the leavening agents and creates the perfect texture for your cookies.
Now, it’s time to cream the butter and sugar. In a large bowl, beat the softened butter and granulated sugar until the mixture is light and fluffy. This step is crucial for achieving the desired melt-in-your-mouth consistency. Once the butter and sugar are well combined, add the egg, vanilla extract, and creamy peanut butter, mixing until the batter is smooth and homogeneous.
The fun part comes next – adding the spooky purple color! Gradually mix in the purple gel food coloring until the dough is evenly tinted, creating a vibrant and eye-catching hue that will have your guests eager to try these Witch Hat Halloween Cookies.
Now, it’s time to combine the wet and dry ingredients. Gradually add the whisked dry ingredients to the wet mixture, stirring until a dough forms. Gently roll the dough into 1-inch balls and place them on the prepared baking sheets, spacing them apart to allow for spreading.
Bake the Witch Hat Halloween Cookies for 8 to 10 minutes, or until the edges are set but the centers are still slightly soft. Immediately after removing the cookies from the oven, press a chocolate kiss or Hug into the center of each one, creating the iconic witch’s hat shape. Allow the cookies to cool completely before serving to ensure the perfect spooky treat.
Decorating Ideas for Witch Hat Halloween Cookies
While the classic witch’s hat look created by the chocolate kiss or Hug is a delightful and iconic way to decorate these Witch Hat Halloween Cookies, there are plenty of other ways to add a personal touch to your spooky treats. Consider dusting the cookies with edible glitter or Halloween-themed sprinkles for an extra pop of festive flair. You could also experiment with different chocolate candies, such as mini Reese’s Peanut Butter Cups or Rolos, to achieve a similar witch’s hat effect.
For a truly eye-catching display, arrange your Witch Hat Halloween Cookies on a platter or tiered stand, along with other Halloween-themed desserts like spider web cupcakes or ghostly meringue cookies. This creates a cohesive and visually stunning spread that’s sure to impress your guests and get them in the spooky spirit.
More Related Recipes You Might Enjoy
Storing and Serving Witch Hat Halloween Cookies
To ensure your Witch Hat Halloween Cookies stay fresh and delicious, it’s important to store them properly. Once the cookies have cooled completely, you can transfer them to an airtight container or storage bag. They will keep at room temperature for up to 5 days, making them the perfect make-ahead treat for your Halloween festivities.
When it comes to serving, these Witch Hat Halloween Cookies are a versatile and eye-catching addition to any Halloween spread. Arrange them on a platter or tiered stand, alongside other spooky snacks and desserts, for a truly haunting display. Don’t be surprised if your guests can’t resist reaching for a second (or third!) cookie – these peanut butter-filled treats are simply too delicious to resist!
Frequently Asked Questions (FAQs)
What do I need to make a witch hat?
To create the witch hat shape for these Witch Hat Halloween Cookies, you’ll need either Hershey’s Kisses or Hug candies. Simply press one of these chocolates into the center of each cookie while it’s still warm, and the chocolate will melt slightly, forming the pointed tip of the witch’s hat.
What is a witch’s hat called?
The distinctive pointed hat worn by witches is commonly referred to as a “witch’s hat” or a “witches’ hat.” This iconic accessory has become a symbol of Halloween and the spooky season, making it the perfect inspiration for these festive Witch Hat Halloween Cookies.
Where does the pointy witch hat come from?
The image of the pointy witch’s hat has its origins in European folklore and mythology. The tall, conical hat is believed to have first appeared in medieval depictions of witches and sorcerers, symbolizing their magical powers and connection to the supernatural. This classic design has endured and become a beloved part of Halloween and witch-themed imagery.
What does a witch’s hat symbolize?
The witch’s hat is a powerful symbol that represents the magic, mystery, and mystique associated with witches and the occult. The pointed shape is thought to mimic the spires of ancient pagan temples and cathedrals, evoking a sense of mysticism and otherworldly power. In the context of Halloween, the witch’s hat has become a playful and lighthearted symbol, adding a touch of spooky fun to these delightful Witch Hat Halloween Cookies.
So, gather your ingredients, preheat your oven, and get ready to create a batch of these enchanting Witch Hat Halloween Cookies that will cast a spell on your guests and have them coming back for more. Happy haunting!
Craving even more magical meals? Browse Amelia’s Pinterest boards for quick dinners, cozy bakes, and tons of flavorful inspiration.
Print
Bake Irresistible Witch Hat Halloween Cookies This Season
- Total Time: 30 minutes
- Yield: 30 cookies 1x
- Diet: Vegetarian
Description
Witch Hat Halloween Cookies are delightful treats combining peanut butter and whimsical charm, perfect for Halloween festivities.
Ingredients
- 1 1/2 cup all-purpose flour
- 2 teaspoon cornstarch
- 1/4 teaspoon baking powder
- 1/2 teaspoon baking soda
- 1/4 teaspoon salt
- 1/2 cup unsalted butter, softened
- 1 cup granulated sugar
- 1 large egg, room temperature
- 1 teaspoon vanilla extract
- 3/4 cup creamy peanut butter
- Purple gel food coloring
- 30 chocolate kisses or Hugs, carefully unwrapped
Instructions
1. Preheat your oven to 350°F and line your baking sheets with parchment paper.
2. In a medium bowl, whisk together the all-purpose flour, cornstarch, baking powder, baking soda, and salt.
3. In a large bowl, beat the softened butter and granulated sugar until light and fluffy.
4. Add the egg, vanilla extract, and creamy peanut butter, mixing until smooth.
5. Gradually mix in purple gel food coloring until the dough is evenly tinted.
6. Gradually add the dry ingredients to the wet mixture, stirring until a dough forms.
7. Roll the dough into 1-inch balls and place them on the prepared baking sheets.
8. Bake for 8 to 10 minutes, or until the edges are set but centers are slightly soft.
9. Press a chocolate kiss or Hug into the center of each cookie immediately after removing from the oven.
10. Allow cookies to cool completely before serving.
Notes
Store cookies in an airtight container at room temperature for up to 5 days.
- Prep Time: 20 minutes
- Cook Time: 10 minutes
- Category: Dessert
- Method: Baking
- Cuisine: American
Nutrition
- Serving Size: 1 cookie
- Calories: 120
- Sugar: 10g
- Sodium: 50mg
- Fat: 7g
- Saturated Fat: 4g
- Unsaturated Fat: 2g
- Trans Fat: 0g
- Carbohydrates: 15g
- Fiber: 1g
- Protein: 3g
- Cholesterol: 15mg